
How to Install and Configure an SSL Certificate on Windows Server and IIS

The rapid growth of internet and website usage demands robust security for its users. Every website owner can build a secure infrastructure based on cryptography using digital certificates with technologies like Secure Sockets Layer (SSL). Below is a step-by-step guide on how to set up an SSL certificate in Internet Information Services (IIS).
🔐 Single Certificate Installation
1. Open the ZIP file containing your certificate. Save the file named your_domain_name.cer to the desktop of the web server you wish to secure.
2. From the Start screen, search for or click on Internet Information Services (IIS) Manager and open it.
3. Click on your Server Name in the left-hand connections panel.
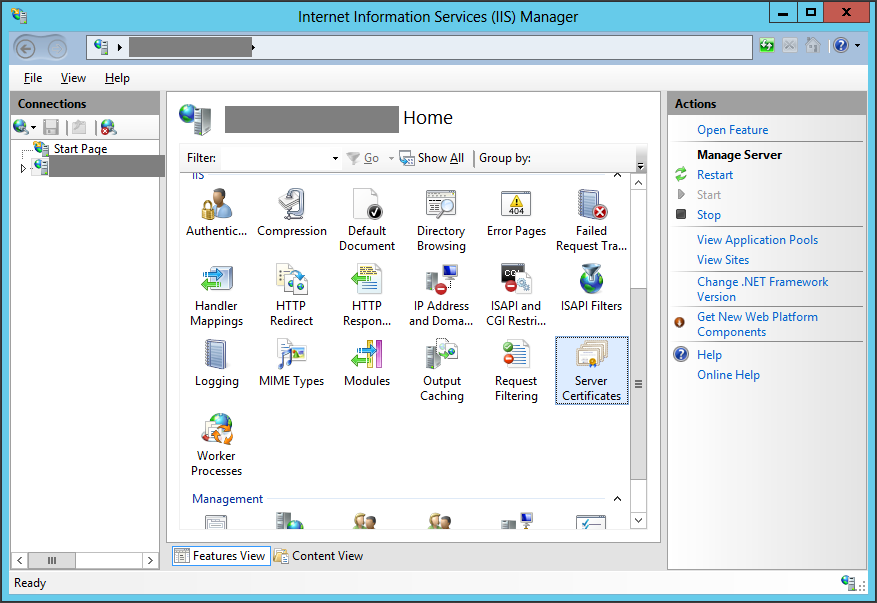
4. From the center menu, double-click the “Server Certificates” icon located under the “IIS” section.
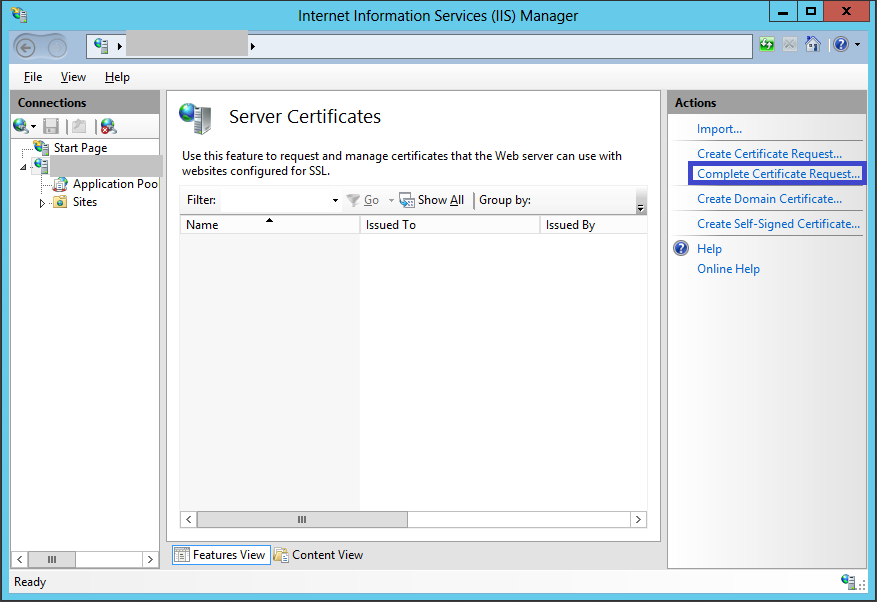
5. In the “Actions” menu (on the right-hand side), click “Complete Certificate Request…” to open the Complete Certificate Request wizard window.
6. Browse to the your_domain_name.cer file. You will then be prompted to enter a friendly name. The friendly name is not part of the certificate itself, but is used by the server administrator to easily identify and distinguish the certificate. Choose to place the new certificate in the Personal certificate store.
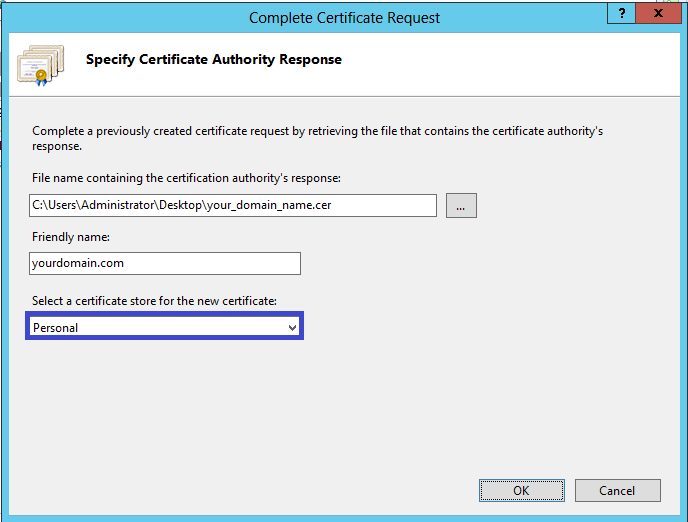
7. Clicking “OK” will install the certificate onto the server.
8. Once the SSL certificate has been successfully installed, you will need to assign it to the appropriate website using IIS.
9. From the “Connections” menu in the main Internet Information Services (IIS) Manager window, select the server name where the certificate was installed.
10. Under “Sites,” select the specific website that you want to secure with the SSL certificate.
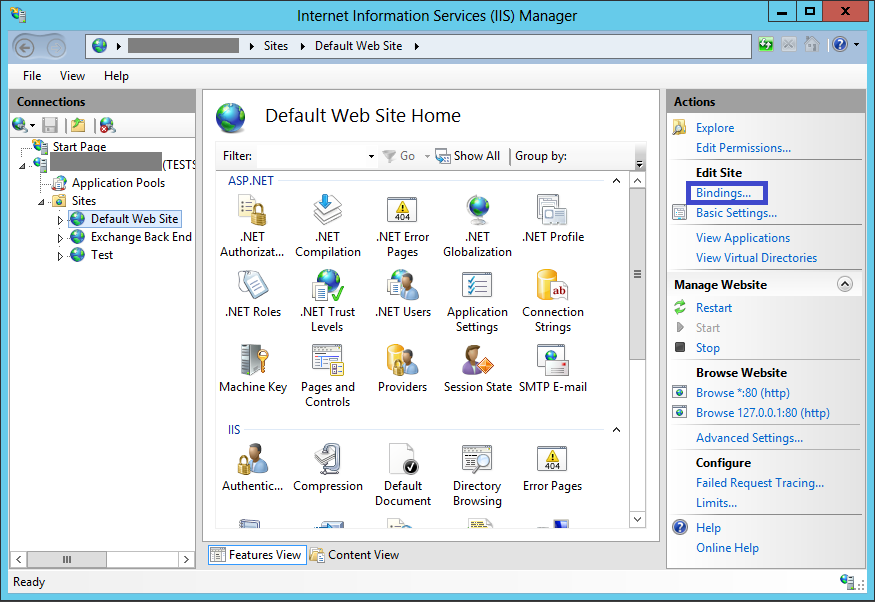
11. From the “Actions” menu (on the right-hand side), click “Bindings…” This will open the “Site Bindings” window.
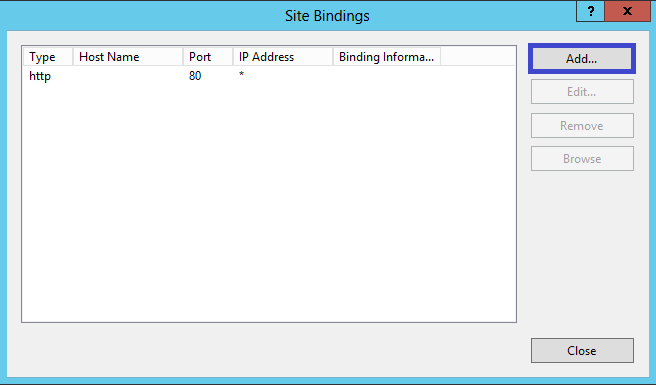
12. In the “Site Bindings” window, click “Add…” This will open the “Add Site Binding” window.
13. Under “Type,” select https. The IP address should be the specific IP address of the website or “All Unassigned”, and the port used to secure traffic with SSL is typically 443.
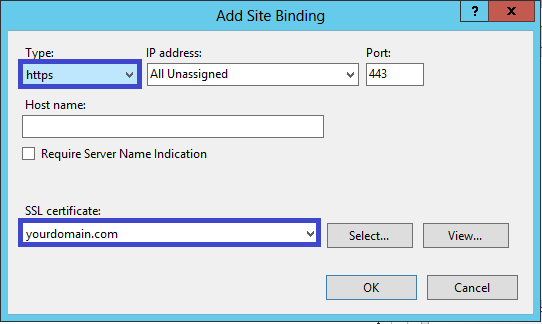
14. Click “OK”.
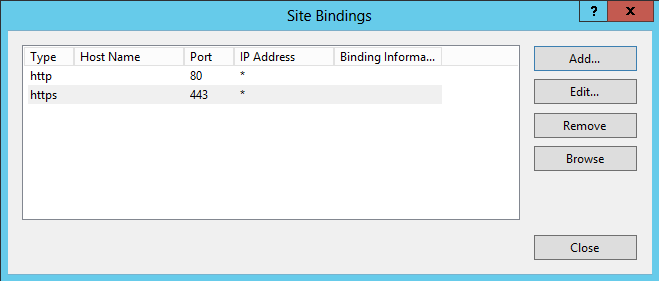
15. Your SSL certificate is now installed, and the website is configured to accept secure connections.
The steps above demonstrate how to install and configure an SSL certificate for a single domain. Meanwhile, the procedure for multiple certificates is as follows:
🔐 Multiple Certificate Installation
- Open the ZIP file containing your certificates. Save the file named your_domain_name.cer to the desktop of the web server you wish to secure.
- From the Start screen, search for or click on Internet Information Services (IIS) Manager and open it.
- Click on your Server Name in the left-hand connections panel.
- From the center menu, double-click the “Server Certificates” icon located under the “IIS” section.
- In the “Actions” menu (on the right-hand side), click “Complete Certificate Request…” to open the Complete Certificate Request wizard window.
- Browse to the your_domain_name.cer file. You will then be prompted to enter a friendly name. The friendly name is not part of the certificate itself, but is used by the server administrator to easily identify and distinguish the certificate. Choose to place the new certificate in the Web Hosting certificate store.
- Clicking “OK” will install the certificate onto the server.
Note:
There is a known issue in IIS 8 where it may display the following error: “Failed to remove certificate”. If this is the same server that was used to generate the CSR, in most cases, the certificate is actually successfully installed. Simply cancel the dialog box and press “F5” to refresh the server certificates list. If the new certificate now appears in the list, it has been correctly installed on the server.
- Once the SSL certificate has been successfully installed, you will need to assign it to the appropriate website using IIS.
- From the “Connections” menu in the main Internet Information Services (IIS) Manager window, select the server name where the certificate was installed.
- Under “Sites,” select the specific website that you want to secure with the SSL certificate.
- From the “Actions” menu (on the right-hand side), click “Bindings…” This will open the “Site Bindings” window.
- In the “Site Bindings” window, click “Add…” This will open the “Add Site Binding” window.
- Under “Type,” select https. The IP address should be the specific IP address of the website or “All Unassigned”, and the port used to secure traffic with SSL is typically 443. In the “SSL Certificate” field, select the certificate that was installed in step 7.
- Click “OK”.
- Your first SSL certificate is now installed, and the website is configured to accept secure connections.
- Repeat the steps to generate a CSR for your second website.
- Install the certificate file as described above, up through step 12.
- Under “Type,” select https. The IP address should be the specific IP address of the website or “All Unassigned”, and the port used to secure traffic with SSL is typically 443. Enter the host name you wish to secure and check the box that says “Require Server Name Indication”. This is required for all additional websites (it is not required for the primary website as shown in step 13). In the “SSL Certificate” field, select the specific certificate installed in step 7 for your additional website.
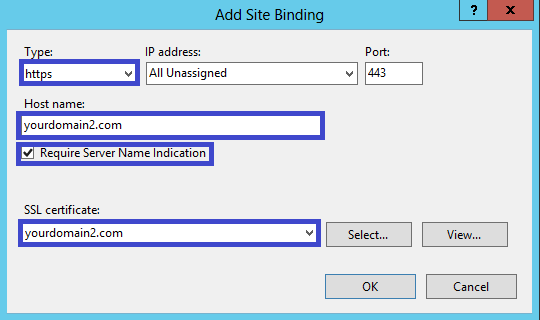
- Click “OK”.
- Your second SSL certificate is now installed, and the website is configured to accept secure connections.
- Repeat steps sixteen through nineteen to set up any additional websites.
Secure & Grow Your Business with Cloudmatika
Cyber threats and service disruptions can happen anytime, directly impacting your operations and customer trust.
Cloudmatika provides a complete cloud & cybersecurity solution — from WAF and Cyber Protection to Cloud Storage — to keep your business safe and running smoothly.
Talk to our team about your infrastructure needs today.